


One of the best things about a sleeper or romper pattern is that it is infinitely customizable. You can add ears, tail, belly “spots”, applique, “ruffs”, spines, foot covers, and more! Last year, my kids all wanted to be Pokemon, so I ended up customizing the MyFit Sleeper pattern for each child.
Of course, you can do more than what is included here, these are just some of the options available for adding to a sleeper to make a bodysuit costume for a child (or adult)!

The Pokemon I made for the kiddos were Pichu, Pikachu, Raichu, Eevee, and Sylveon. I will be including some of the additions from the Raichu and Eevee costumes.
If you want to have your additions stand up or be firm/stiff, you will need some kind of heavyweight interfacing. I used Pellon 50 that I cut a little smaller than the size of the pattern piece to give the ears, tails, and other pieces structure.
The first thing I did for each costume was to find a stock photo of each Pokemon, preferably from both front and the back. I made a list of the different things that needed to be added to each costume. For example, for Eevee, I needed to add ears, tail, and a mane. Since my daughter was going to be Eevee, she elected to have the female Eevee tail, which has hearts on the end.
For construction, the first step was to project (or you can enlarge and print) the ears and trace them on paper or cut the fabric directly.


Because the Eevee tail is round, I halved the tail piece and cut it as four separate panels and then cut the end of the tail piece in a curve to make the “heart” for the end of the tail. I sewed together the tail ends to the tail bottoms and then sewed those four complete pieces together to make the tail.

Because I needed the tail to stand up, I sewed a wire hanger into the back of the romper (sorry I don’t have pictures). Because I knew I’d need to do this, I picked a ½” seam allowance for the romper and used a zipper foot to sew down the edge of the inside of the seam allowance to enclose the wire hanger in the back and put the top end of the wire into the seam below the hood. Also, the opening of the tail was large, so I hand sewed it to the back around the edge of the tail so it would still be round after attachment. I used lightweight foam to stuff the tail to keep it from collapsing.
For the mane, I used yarn that I looped and sewed onto the neckline before I added the hood. I snipped the bottom of the loops after they were sewed onto the neckline.


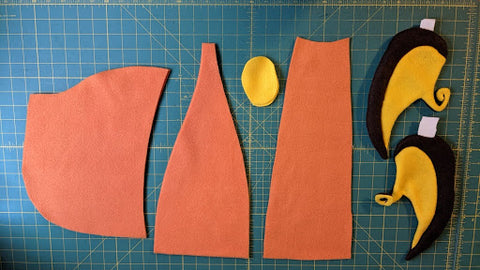
For the Raichu costume, there were a lot of complicated pieces. I started by tracing the ear and tail pieces. I freehanded the belly piece, just making sure that there was overlap for a seam allowance between the main and the belly pieces. Raichu required a belly piece, ears, cheek applique, and tail. This costume was complicated by the fact that the ears needed to stand up some and they are also three dimensional.
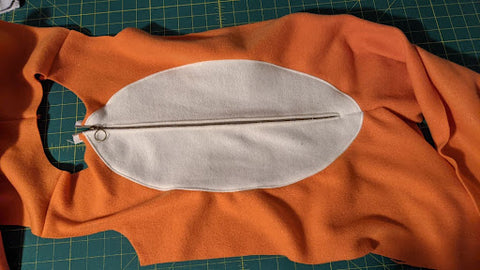
First, as with Eevee, I projected the pieces and traced or cut the fabric directly. In the case of the belly piece, I opened the romper pieces in Inkscape and added an ellipse to the pattern front and moved it around until I was satisfied with the placement. I cut around the ellipse making sure to include seam allowance and cut the bodice piece also including the extra seam allowance.


Because the tail piece is an odd shape with a lot of corners, when I was assembling, I didn’t sew the entire perimeter, but rather left 3-4” open where the long tail tube would need to be joined to the tail piece. If you do a shape like this, make sure to trim your points and snip into your corners and trim the seam allowances there. This will make your corners nice and sharp. You can also use a pin to pull the corners through more


After sewing the tail pieces, I added stiff sew in interfacing to give the tail body and structure. Because the tail is a weird shape with a small opening, I rolled up the interfacing to get it inside and then massaged it into place.

To sew the tail tube, I tried a new-to-me technique, taking a long thread tail and putting it down the inside of the tube to pull through at the end since I didn’t fancy turning a 50” tube. It worked really well and was a lot easier than turning by hand!

After sewing the tube, I needed to add it to the tail and I wanted to do it with seams enclosed, so I sewed it right sides together to the opening of the tail piece.


I pulled the tube through and then folded the side seams in so that they were enclosed and then sewed down the outside edge as close to the edge as I could. Tail, done!

To sew the belly piece in, I lined up the belly cutout and the front bodice pieces right sides together and sewed. Make sure you check that both belly pieces are in the same place on each side! I topstitched the seam allowance around the belly piece, but that is totally personal preference! Once your belly piece is in, you can then treat the whole thing like a complete front piece and sew the zipper in as in the pattern instructions.
Since I wanted to make sure that the belly piece was lined up, I followed the following procedure for putting in the zipper: I basted the front seam allowance with a 5mm straight stitch down the front the length of my zipper and then switched to a normal stitch length for the rest of the length. Next, I used my fingers to push open the seam allowance all the way down. I then used double sided tape (DST) on both sides of the zipper and lined it up on the opened seam allowance and sewed down one side of the zipper and up the other side making sure to go back and forth on the bottom a few extra times to secure the bottom of the zipper tape. After attaching the zipper on both sides, I ripped the basted stitches down the center and double checked that the zipper wasn’t terribly wonky and could easily open and close.

It’s really important to NOT do what I did the first time and forget to sew the tail into the back bodice pieces. I needed to seam rip and sew it in after the fact, but you can totally do this before and save yourself the angst.
Moving on to the hood, I assembled all my pieces and moved on to putting the ears in.
One of the best things about a three piece hood is that it is easy to put ears in any direction. Because the Raichu ears are a weird shape, I put interfacing in the ears and left tabs sticking out the bottom of the ears to attach to the hood.


To put on the cheek pieces, I first stitched around the outside with a straight stitch and then I did a 0.5mm stitch length and 2.0mm stitch width zigzag all the way around the outside of the cheek circle. You can also skip zigzagging around the outside as long as you’ve stitched around the outside and made sure your piece is secured. Other people have used embroidery machines to add eyes and cheek circles instead of electing for appliques.
Once all that is done, the rest is easy! Assemble your romper as in the instructions, add your feet (if you want to add shoe covers, you can just do the top of the foot and not the bottom, but I elected for cuffs on the arms and legs) or cuffs or hem.
Voila, it is finished!

The last step, put them on the excited children and take pictures, if you so choose. ;)


It is worth mentioning that a fair amount of work goes into costumes like these and it can be frustrating if an idea doesn’t work perfectly the first time or if something comes out a little wonky or not lined up perfectly. When stuff like that happens (especially with animal costumes, fictional or otherwise) I just remind myself that genetic variation is a thing and that
- No one but me knows those little imperfections are there and
- People will see the amazing whole you created and little mistakes will not diminish your joy at seeing your make worn or the joy of the person wearing the costume.
- There’s almost always someone out there who can make it fancier or better. I aim for the best I can do with what I have and the time available.
If you use the MyFit Sleeper to make costumes we would love to see your creation! Please join us in our Facebook Group and post or tag us on Instagram.
Happy creating, friends! <3
~Magdalene Jackson
Your outfits are lovely.
Kids obviously love them.
Plus, mommy made them.
They will always remember your effort and love it for ever.
Your outfits are lovely.
Kids obviously love them.
Plus, mommy’s made them.
They will always remember your effort and love it for ever.
I didn’t even think about using the sleeper to make a costume at first but this is so creative! I absolutely love it!