

My daughter loves dresses-especially when they twirl. She also loves it when I make her clothes and I really like doing it-she is so gratifying to sew for, the excitement she feels is contagious and rewarding.
The add a circle skirt to anything generator is one of my favorite things we offer because it is so versatile and I don't have to do any of the figuring.
For her dress I started with the MyFit Tee. I took all of her measurements and decided I wanted her skirt to start at her waist. For the full height measurement I entered the same measurement as high shoulder to waist.
You can see in the next image that the pattern's cut line is above the hip markers.
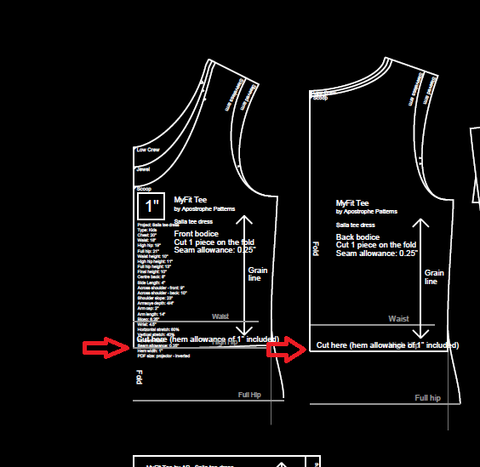
Knowing I wanted sleeves to be just below the elbow before adding flounces, I cut on the 3/4 sleeve line.

Cut your shirt pieces and assemble them following the pattern instructions. Do not hem the bottom or the sleeves.

After the shirt is assembled, but not hemmed, measure the bottom opening of the shirt at the hem and for the flounce sleeves, I also measured the opening of the sleeves. (not pictured)

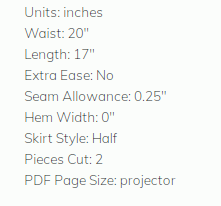
If you use a straight ruler, as I did, make sure to double the measurement when inputting the "waist" measurement.
To determine the length of the skirt, I measured from the spot I took the waist measurement from for the MyFit Tee down to where I wanted the hem of the skirt.
I only had 1 yard of the fabric I wanted to use for the skirt and flounces, so chose the half circle skirt. I chose to cut the skirt in 2 pieces.
I measured the sleeve opening the same way, doubled the measurement and put the sleeve opening in as the "waist" measurement. I opted for the high/low for the sleeve flounces. I want the longer part of the flounce to be on the back side of the sleeve. So for length, I used the option to split.

Cut your skirt in as many pieces as specified and then put the pieces right sides together and sew the side seams up, repeat until your skirt is closed. I used 2 pieces so could do both sides at the same time. If you chose more pieces sew just one side up, open the skirt and add another panel until you have added all your panels. Then close the last two raw side seams by sewing them together.

For the sleeves: Cut two sleeve flounces-which look a little funny with the high/low shaping, but they'll come out great. I cut these in 1 piece, so there are no seams on the sleeve flounces.

Turn your skirt so right sides are together. Shirt should be right sides out. Find the center front and center back of your shirt and of the skirt. I used the side seams as the other quarter points.

Rotate the shirt so that you can put it inside the skirt and match the raw edges of the shirt hem and skirt waist. Match quarter points and side seams. Right sides of the shirt and skirt will be together.

Using your selected seam allowance, sew the waist seam.

Turn your project right side out.

Next prepare the sleeve flounce. I marked the center points and made sure one center was on the low end and one on the high end.

Next I found the center front and center back of my sleeve. I did not use the sleeve seam as one of the center points because I wanted the high low to be to the front and back and not positioned at the inner arm.

Match the low end of your circle to the center front sleeve marking, right sides together.

Match the high end to the center back mark. Right sides of your sleeve and flounce will be together.

Using your selected seam allowance, sew around the sleeve circle. Turn the flounce down so right sides are out and your sleeve will look like this.

At this point you may now hem your circle skirt and sleeve flounces if you desire. I chose not to, this fabric is double brushed poly and won't present a problem down the road being unhemmed.


We invite you to join our Facebook group and share your projects with us. We love to see what you are creating.
We can also be found on Instagram. Please tag us when you share your creations there.
Thanks for joining me today, Happy Creating! ~Cynthia
Thanks for joining me today, Happy Creating! ~Cynthia
Very pretty! Thank you for your excellent instructions!