

I always enjoy finding ways to combine patterns and do mash ups to get new looks. Someone must have mentioned bell bottoms because my mind started working on how I could achieve that look using the patterns here at Apostrophe. I love the MyFit patterns, so I definitely wanted to create the look using the pattern generators. I worked out 2 different methods for 2 different looks. This method makes a big statement and is really fun!
I am working with the MyFit Leggings and the Add a Circle Skirt to anything patterns to show you how I made bell bottoms for my daughter. She loves fun clothes and watching her walk in the finished bell bottoms is one of my favorite things ever. Lots of kick steps.
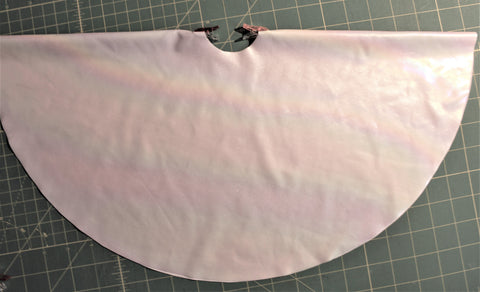
For this method, I used a full circle skirt and the pant has a connecting seam just below the knee.
I started with my daughters measurements and used the capri option so the legging would end just below the knee.

Notice that I changed the leg finish and instead of choosing a large hem I made it match my seam allowance. I did this since that will be where I attach the circle skirt.

I measured the leg opening and used that as the waist measurement for my circle skirt and measured from the bottom of the knee to the floor to get the desired length for the circle skirt. I chose the cut in one piece option for the circle skirt.
Here are my printed patterns. Notice the fold markings on two sides of the skirt piece. I'll show you how I cut that.

I first fold the fabric up enough so that the whole pattern can rest on the folded section. Continue this fold the whole length of your fabric, you need it to be straight for the next step. I use a long ruler, move the pattern from the fabric, and fold from the unfolded edge of the fabric over the ruler. Then gently pull the ruler out without disrupting the folds.

Here I have lifted the edge of the fabric for a visual. The fabric should now have a folded square with 2 folds on the bottom edge and one fold on the side.

Place the pattern back over the fabric with the fold markings on the folds. Cut your pattern out and repeat to get a second skirt for the other leg.

The leggings pattern instructions have the crotch sewn first, but to reduce bulk when attaching the circle skirts, I decided to sew the inseams first. Follow these steps for both legs. With right sides together, pin and sew the inseam.
**Note: You pattern may have a longer back inseam than front, that is normal for some measurement sets. In that case, ease the back into the front by gently stretching the front inseam to match.

Turn the leg right side out and mark the seam and the halfway mark from the seam.

Mark the center of the circle skirt opening in two places, at the halfway mark as well.
With the right side of the skirt matching the right side of the pant leg, match the halfway points you have already marked. Sew the seam to attach the circle skirt.

After attaching the skirt to both legs, we will use the leg in leg method to sew the crotch seams. Turn one leg right side out and the other wrong side out. Pull the leg that is right sides out onto your arm, then pull the wrong side out leg over the leg on your arm, being sure that the seams are in the same place on your arm. This makes it really easy to line up the crotch seams and sew them in one pass.

Once the crotch is sewn up, refer to the tutorial to a attach your chosen waistband. Then hem the bottom of the circle skirt.
Look at these all finished, so much fun and lots of drama! My daughter was having a blast kicking these out while she walked for extra effect.


I hope you feel inspired! If you make some bell bottoms using this method, please come share it in the Apostrophe Patterns fb group or if you share on Instagram, tag @apostrophe.patterns so we can see your creations!
Thanks for joining me- Cynthia
Interested in a different technique? Try Method #2