

In our last post, we discussed printing physical, miniature copies of your original and adjusted patterns to view the changes that happen to your pattern based on new options or measurements. Another method, which is completely digital, is to use a free program called Inkscape. In Inkscape we are able to overlay the two patterns digitally. Let’s walk through that method now.
You will need to have downloaded and installed Inkscape. Inkscape is a free program and a great tool, especially when comparing patterns. You can find it here. Click on your operating system to begin the download.

Before opening Inkscape we need to download your patterns. For ease when comparing, you will want to go back into your project, and using the previous button to navigate, find this page and select the option for the fewest number of pattern pieces. This will eliminate duplicates and make it easier to find the pieces we need. This is not an option on all Apostrophe Patterns at this time, if your pattern does not include this option, please proceed to the next step.

When doing a digital comparison in Inkscape, we use projector files. After selecting the fewest number of pages, if applicable, use the next buttons until you reach the file selection page. Select Projector File in the drop down menu, press next and download your original pattern as a projector file.

Then, use the previous buttons to go into the measurement pages or the style option pages and make your desired changes. Once your changes are made, use the next buttons to get back to the download page. Change your project name, select save, and then download again.
Once both patterns are downloaded it is time to get started in Inkscape. When you first open Inkscape, you will see this screen. Select New document.

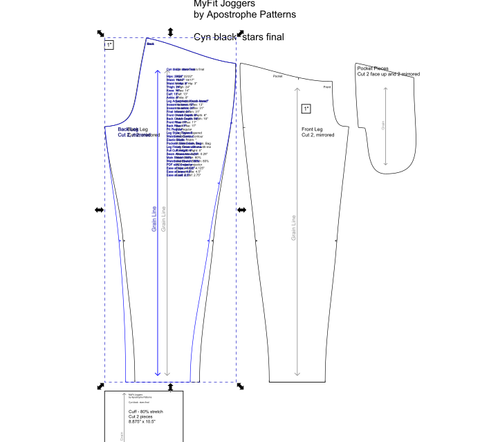
After Inkscape loads, select File, Open. Then find your original pattern.


You should be looking at this screen now, which will have your pattern visible. The first step to take is to select the whole pattern and Group it together using ctrl + g.

Then I like to zoom the pattern to fit my screen. The red arrow is pointing to the zoom menu. Once open, select the circled zoom option. This will enlarge your selection to fit the window and make the pattern easier to view and manipulate. Be sure to click the black arrow in the red box right away, or anything you click will just continue to zoom the screen.

Next, open the adjusted pattern using the same method as above. (File, Open.)
Once again, select the whole pattern. Before grouping, change the color of the lines to better differentiate which pattern is which. The color can be changed by holding the shift key and clicking the color of your choice. The color options can be found along the bottom of the screen. In this case, I chose blue.

Once the color has been changed, it is time to group the pattern pieces. Instead of grouping the whole pattern as was done for the original, I find it best to group each pattern piece individually, since changes to measurements and options can adjust a pattern piece's location. To compare all the pieces correctly, they need to move independently of one another. For the joggers pattern, it is most important to compare leg front and back, so those are the only two grouped and they are grouped separately of one another.
After grouping the leg front and the leg back, copy just one using ctrl + c. I started with the leg back. Then click over to your original pattern window and paste, using ctrl + v. Your screen should now look similar to this.

You can move the blue pattern piece to overlay the corresponding pattern piece while it is still selected, as indicated by the dotted line surrounding it, by using the up and down arrows on your keyboard or by hovering your mouse over the pattern piece and when the icon has 4 arrows, click and drag the piece to overlay. You can then use the up/down/right/left arrows to adjust until it is overlaid correctly.
I like to line up pants patterns by matching the crotch points, as I find that helps me see best what changes have been made. That is my preference and you may prefer lining up at the side seams.
Repeat with the other pattern pieces. Return to the adjusted pattern window, copy the piece, and paste it into the original pattern window. Then drag it to the right position and use the arrows to make small adjustments until it is overlaid correctly.
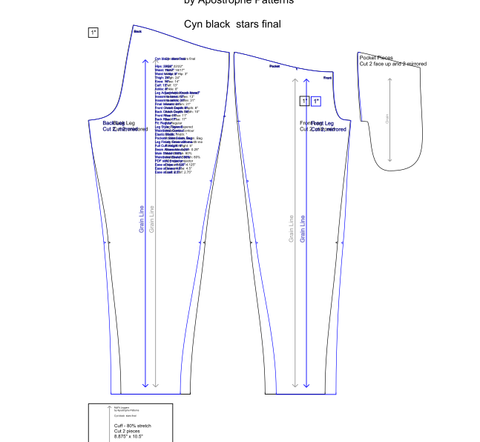
Now that the front and back leg pieces have both been overlaid onto the original pattern, the changes can be evaluated. In this case, the only change made to my pattern was to use the Knock Knee/Full inner thigh adjustment. The change this adjustment makes can be seen clearly now, the fabric of the leg is more toward the center of the body/inseams.
Comparing patterns saves time and fabric by allowing us to easily see how measurement and style changes can affect the pattern.
If you prefer printed comparisons, please see the blog post here.
Please join us in our FB Group or tag us on Instagram to share your makes or if you have any questions.
~Cynthia and the AP Team